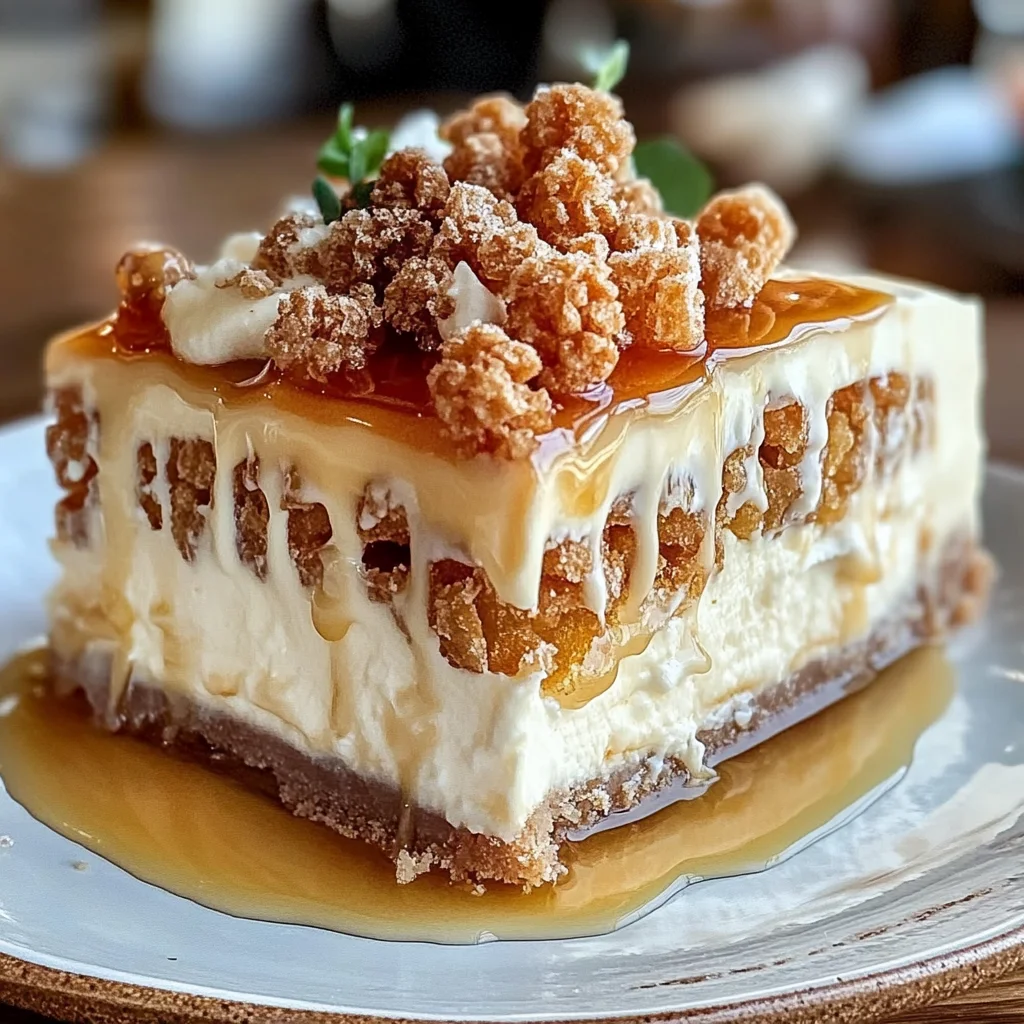
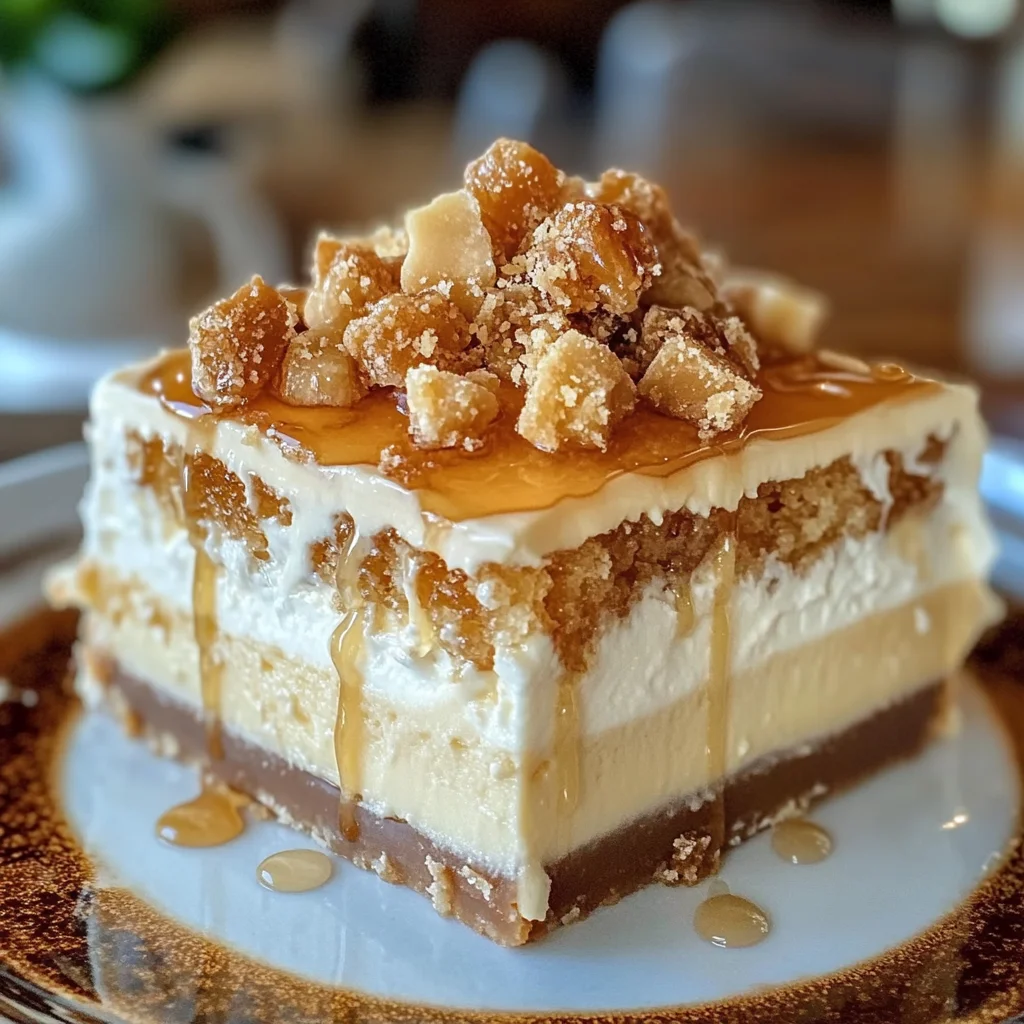
If you’re looking for a dessert that will wow your guests and become a favorite in your household, then this Crunchy & Creamy Honeycomb Cheesecake Cake is just what you need! This delightful cake combines the rich creaminess of cheesecake with the sweet crunch of honeycomb, creating a texture and flavor explosion that everyone will love. Whether it’s a special celebration, a family gathering, or a treat for busy weeknights, this recipe is sure to impress.
What makes this cake even more special is how easy it is to make. With simple ingredients and straightforward steps, you’ll find yourself whipping it up again and again. Plus, it’s perfect for sharing—you might want to keep an extra slice hidden just for yourself!
Why You’ll Love This Recipe
- Deliciously Irresistible: The combination of creamy cheesecake and crunchy honeycomb creates a unique taste that’s hard to resist.
- Easy to Make: With only a few simple steps, you can create this showstopper without spending all day in the kitchen.
- Family-Friendly: This dessert appeals to both kids and adults alike—everyone will clamor for seconds!
- Make-Ahead Convenience: Prepare it ahead of time and let it chill in the fridge; it’s perfect for those busy days.
- Customizable: Add your twist by experimenting with different toppings or flavors.
Ingredients You’ll Need
Gathering these wholesome ingredients is half the fun! They’re simple and likely already in your pantry. Let’s dive into what you’ll need to create this heavenly Crunchy & Creamy Honeycomb Cheesecake Cake.
For the Crust
- 2 cups graham cracker crumbs
- 1/3 cup unsalted butter (melted)
- 1/4 cup granulated sugar
- 1 pinch salt
For the Cheesecake Filling
- 24 oz cream cheese (softened)
- 8 oz mascarpone cheese
- 3/4 cup powdered sugar
- 1 tsp vanilla extract
- 1.5 cups heavy whipping cream
- 1/4 tsp orange blossom water (optional)
For the Topping
- 1.5 cups honeycomb candy (chopped)
- 4 oz white chocolate (drizzled)
- 2 tbsp honey
- extra honeycomb (for topping)
Variations
This recipe is wonderfully flexible! Feel free to switch things up based on your preferences or what you have on hand. Here are some fun ideas:
- Add Fresh Fruit: Top your cheesecake with fresh berries or sliced bananas for an added fruity flair.
- Switch Up the Topping: Try using caramel sauce instead of honey for a different sweet twist.
- Experiment with Flavors: Incorporate citrus zest or spices like cinnamon into the filling for added warmth.
- Go Nutty: Add chopped nuts like almonds or pecans into the crust for an extra crunch.
How to Make Crunchy & Creamy Honeycomb Cheesecake Cake
Step 1: Prepare the Crust
Start by mixing together the graham cracker crumbs, melted butter, sugar, and salt in a bowl. This mixture will form a delicious base that adds crunch to each bite. Press it firmly into the bottom of a springform pan. A well-formed crust helps hold everything together and ensures each slice looks beautiful!
Step 2: Make the Cheesecake Filling
In another bowl, beat together the softened cream cheese and mascarpone until smooth. Gradually add powdered sugar and vanilla extract while mixing until it’s creamy and light. Why? This mixture forms the heart of our cake—it’s where all that rich flavor comes from!
Step 3: Whip the Cream
In a separate bowl, whip the heavy cream until stiff peaks form. Gently fold this into your cream cheese mixture along with optional orange blossom water if you’re using it. Folding carefully preserves air in your whipped cream, ensuring your cheesecake filling is light and fluffy.
Step 4: Combine with Honeycomb
Gently mix in the chopped honeycomb candy until evenly distributed throughout the filling. The pieces of honeycomb will add delightful crunchiness to every bite!
Step 5: Assemble the Cake
Pour your cheesecake filling over the prepared crust in your springform pan. Smooth out the top with a spatula and pop it into the fridge to set—this usually takes about 6 hours or overnight if you can wait! Chilling allows all those amazing flavors to meld beautifully.
Step 6: Decorate Before Serving
Once set, drizzle melted white chocolate over the top and finish with extra honeycomb pieces for decoration. Not only does this step add visual interest, but it also amps up that sweet flavor!
Now all that’s left is to slice up this Crunchy & Creamy Honeycomb Cheesecake Cake and share it with friends or family—enjoy every delicious bite!
Pro Tips for Making Crunchy & Creamy Honeycomb Cheesecake Cake
Making a cheesecake can seem daunting, but with a few helpful tips, you can ensure your Crunchy & Creamy Honeycomb Cheesecake Cake turns out perfectly every time!
-
Use Room Temperature Ingredients: Allow your cream cheese and mascarpone to come to room temperature before mixing. This ensures a smooth, lump-free batter which is essential for that creamy texture.
-
Whip the Cream Separately: For maximum fluffiness, whip the heavy cream in a separate bowl until soft peaks form before folding it into the cheesecake mixture. This adds airiness and lightness to your cake.
-
Chill Thoroughly: After assembling your cheesecake cake, make sure to refrigerate it for at least 6 hours or overnight. This allows the flavors to meld together beautifully and gives the cake a firm structure.
-
Customize Your Honeycomb: If you’re feeling adventurous, try different flavors of honeycomb candy! Lavender or citrus-infused honeycomb can add a unique twist to your dessert.
-
Drizzle with Extra Honey: Just before serving, drizzle some additional honey over the top. It not only enhances the flavor but also adds an appealing glossy finish.
How to Serve Crunchy & Creamy Honeycomb Cheesecake Cake
Presentation is key when serving this delightful dessert! Here are some ideas on how to make your cheesecake cake shine during any occasion.
Garnishes
- Fresh Berries: Add a handful of fresh berries like raspberries or blueberries on top for a burst of color and tartness that complements the sweetness of the cake.
- Mint Leaves: A few sprigs of fresh mint not only add a pop of green but also provide a refreshing contrast to the rich flavors.
- Edible Flowers: For an elegant touch, sprinkle some edible flowers around the plate or on top of the cake; they make for stunning visual appeal.
Side Dishes
- Vanilla Ice Cream: A scoop of creamy vanilla ice cream served alongside enhances the overall experience with its coolness and additional creaminess.
- Fruit Salad: A light fruit salad made with seasonal fruits can provide a refreshing counterbalance to the richness of the cheesecake.
- Chocolate Sauce: Drizzling warm chocolate sauce over each slice adds an indulgent element that chocolate lovers will appreciate.
- Coffee or Tea: Serving slices with a cup of freshly brewed coffee or herbal tea creates a comforting pairing that encourages guests to linger over dessert.
With these tips and serving suggestions, your Crunchy & Creamy Honeycomb Cheesecake Cake is sure to be a showstopper at any gathering. Enjoy every bite!
Make Ahead and Storage
This Crunchy & Creamy Honeycomb Cheesecake Cake is perfect for meal prep! You can prepare it in advance, making it an ideal dessert for gatherings or special occasions. Here’s how to store it and keep it fresh.
Storing Leftovers
- Store leftovers in an airtight container in the refrigerator.
- Enjoy within 3 days for the best taste and texture.
- If you notice any excess moisture, gently dab with a paper towel before serving.
Freezing
- Wrap individual slices tightly in plastic wrap and then place them in a freezer-safe bag.
- This cake can be frozen for up to 2 months.
- Thaw overnight in the refrigerator before serving.
Reheating
- For best results, allow the cheesecake to sit at room temperature for about 30 minutes before enjoying it again.
- If you prefer a warm piece, microwave on low power in 10-second intervals until just warmed through.
FAQs
Here are some common questions about the Crunchy & Creamy Honeycomb Cheesecake Cake.
Can I make this Crunchy & Creamy Honeycomb Cheesecake Cake without heavy cream?
Yes! You can substitute heavy whipping cream with coconut cream for a dairy-free alternative. Just ensure it’s well chilled before whipping.
How do I achieve the best texture for my Crunchy & Creamy Honeycomb Cheesecake Cake?
For the creamiest texture, ensure your cream cheese and mascarpone are at room temperature before mixing. Beat them until smooth, and then gently fold in whipped cream to maintain airiness.
What can I use instead of orange blossom water?
If you don’t have orange blossom water on hand, you can omit it or substitute with a splash of vanilla extract for added flavor.
How long can I store the Crunchy & Creamy Honeycomb Cheesecake Cake?
You can store this cake in the refrigerator for up to 3 days. For longer storage, consider freezing individual slices.
Final Thoughts
I hope this Crunchy & Creamy Honeycomb Cheesecake Cake finds its way into your kitchen! It’s such a delightful dessert that combines creamy goodness with crispy honeycomb crunch. Enjoy making it as much as you’ll enjoy sharing it with loved ones. Happy baking!
Crunchy & Creamy Honeycomb Cheesecake Cake
If you’re in search of a show-stopping dessert that’s both delightful and easy to prepare, look no further than this Crunchy & Creamy Honeycomb Cheesecake Cake. This delectable treat harmonizes the smooth richness of cheesecake with the sweet crunch of honeycomb, making it an instant favorite for gatherings or cozy family nights. With straightforward steps and common ingredients, you’ll find yourself making this cake time and again. Whether you’re hosting a celebration or simply indulging on a weeknight, this cake is bound to impress everyone at the table.
- Prep Time: 30 minutes
- Cook Time: Chilling time of at least 6 hours
- Total Time: 0 hours
- Yield: Serves approximately 12 slices 1x
- Category: Dessert
- Method: No-bake
- Cuisine: American
Ingredients
- 2 cups graham cracker crumbs
- 1/3 cup unsalted butter (melted)
- 1/4 cup granulated sugar
- 1 pinch salt
- 24 oz cream cheese (softened)
- 8 oz mascarpone cheese
- 3/4 cup powdered sugar
- 1 tsp vanilla extract
- 1.5 cups heavy whipping cream
- 1/4 tsp orange blossom water (optional)
- 1.5 cups honeycomb candy (chopped)
- 4 oz white chocolate (for drizzling)
- 2 tbsp honey
- extra honeycomb (for topping)
Instructions
- Prepare the crust by mixing graham cracker crumbs, melted butter, sugar, and salt. Press into the bottom of a springform pan.
- In a bowl, beat together softened cream cheese and mascarpone until smooth. Gradually add powdered sugar and vanilla extract.
- Whip heavy cream until stiff peaks form; gently fold into the cream cheese mixture.
- Mix in chopped honeycomb until evenly distributed.
- Pour filling over prepared crust; smooth top and refrigerate for at least 6 hours or overnight.
- Before serving, drizzle melted white chocolate on top and add extra honeycomb for decoration.
Nutrition
- Serving Size: 1 slice (approximately 100g)
- Calories: 360
- Sugar: 28g
- Sodium: 180mg
- Fat: 27g
- Saturated Fat: 16g
- Unsaturated Fat: 10g
- Trans Fat: 0g
- Carbohydrates: 29g
- Fiber: 1g
- Protein: 4g
- Cholesterol: 80mg


Leave a Comment